Batch and Collect Tutorial
This tutorial will guide you through an example of combining the Batch and Collect features in Simul8.
Step 1: Understanding Batching
Batching in Simul8 is the term given to situations where you split up a Work Item into more than one Work Item. For example, if a piece of sheet metal arrives at a factory, it is one Work Item, but at an Activity you may cut this up into, say, 2 separate pieces. You now have 2 Work Items rather than one, and it is important to represent this in your simulation.
This can be represented in the following way:
Before the simulation is run, there are 100 Work Items. Activity 1 batches each Work Item into 2.

After the simulation is run, those 100 Work Items have each been split into 2, giving 200 Work Items after the Activity.

To set this up, build the ‘before’ model above, making sure to set a Start Up value of 100 Work Items in the first Queue. You can do this by selecting the Queue and clicking Start-Up in the Properties tab.

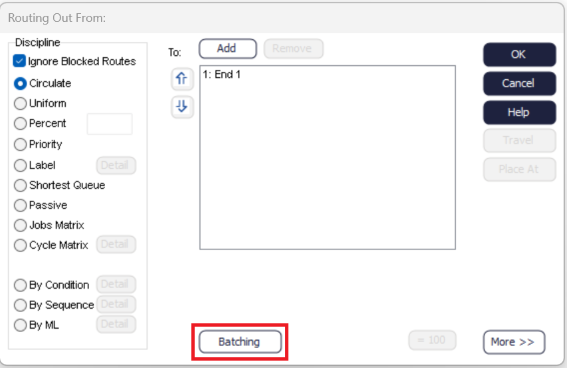
Next, set the batch size of the Activity. The default setting is that one Work Item in = one Work Item out. Select the Activity, then either click on Batching Out under the Activity's Properties tab or click Routing Out, and the Batching button (below).
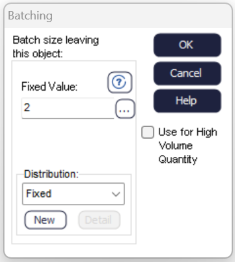
The next dialog asks you to enter the ‘Batch size leaving this object’, this is the number of Work Items which will leave the Activity for each one that enters.
In this example, we want two Work Items to leave for every one Work Item that enters, so the batch size will be 2.
Step 2: Understanding collecting
Use the Collect feature to assemble several items together in an Activity and create one individual item as an output.
In the example below, we will set up the simulation to ‘collect’ one Car Body and four Wheels, in order to output one car.
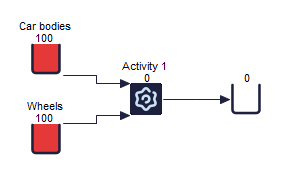
First, build the structure above, remembering to prepopulate the 2 Queues with 100 Work Items each. The next step is to configure the Car Assembly Activity, so it knows how many Work Items to collect from each Queue to assemble one complete car.
Select Car Assembly and go to Routing In from the ribbon (collecting is to do with what you bring into an Activity).
Next, choose the Collect discipline from the list on the left-hand side of the dialog.
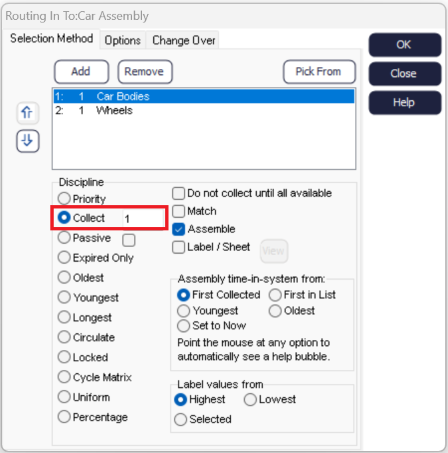
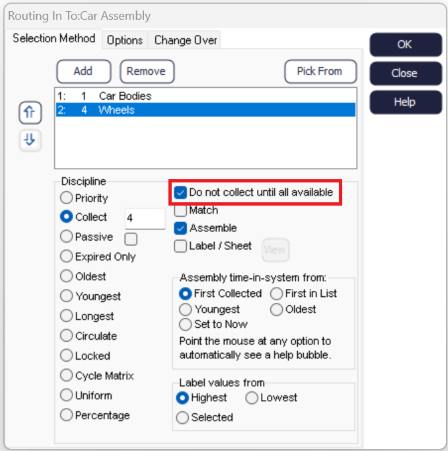
You can now tell your simulation how many Work Items to collect from each Queue to output one Work Item. Configure this by selecting each Queue and typing the required number in the input box next to collect. We require 1 Car Body and 4 Wheels to produce each complete car. You will notice the list will update to show the required amount of Work Items from each Queue.
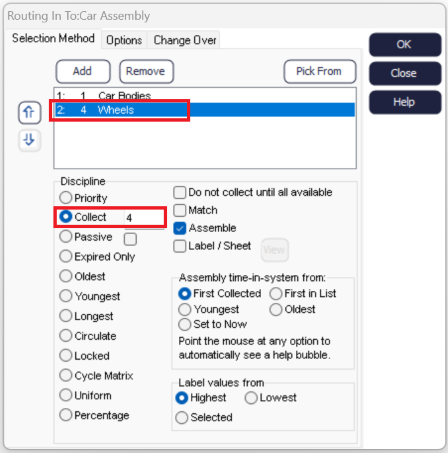
Before you run the simulation
How many complete cars should you be able to create?
Run your simulation and check whether this matches with your estimate.
After running your simulation, it should look like the below, we have created 25 cars. One is still in progress, stuck in the Car Assembly Activity because we have run out of wheels.
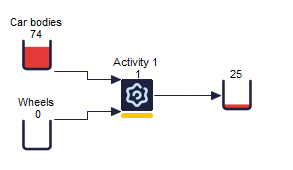
To avoid moving Work Items into the Activity before all the required parts are available, use the ‘Do not collect until all available’ option on the Routing In dialog.
