Index
The Index property is a number attributed automatically to all Objects when they are created. Its value for each Object corresponds to the order of its creation, e.g. the first Object created gets an Index of 1, the second of 2, and so on.
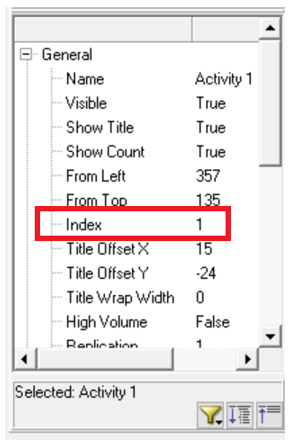
The Index property is listed and can be manually edited in the Quickview Window

You can also get and edit an Object’s Index through Visual Logic which is useful if you want to change multiple Objects’ Index simultaneously. For example, the following piece of code loops through all Queues and if they have an Index value “1”, it sets the Shelf Life of all the Queues to 20 (minutes or any other time unit you have selected in your simulation).

In this example, the Loop Object command is used for looping through the Queues, and obj_Queue is the object used as the Object parameter.
Use of Index
The following example explains how using Index can be very beneficial on certain occasions. Let’s assume we want to count how many Work items have exited from each of our Activities in the following model and store the results in a spreadsheet.

We will show how the use of Index can offer a faster and safer way to do that. Let’s first see how we could approach the problem without the use of the Index Property.
First, let’s greate a spreadsheet called ss_Results, and type in the names of our Activities. On each line we wish to get the number of items exiting each Activity
To do this, we could create a Visual Logic section that we can name “Proc_Count Items”. This section gets the Activity from which a Work item exited each time with the help of the Get Current Object command.Then, this section loops through the spreadsheet using awhile loop until a cell in the first column matches our Activity’s name. When this happens we add 1 to the cells on the second column, every time a Work Item exits the Activity that called the command (i.e the cell corresponding to each Activity gets incremented).
the Proc_Count Items Visual Logic section On Exit logic of each of our 6 Activities, so Get Current Object obtains the respective Activity.
While this approach helps us get the results we need, it’s not versatile because you could make a spelling mistake when typing in the names of your Activities. Also, you would need to type in more names if you add more Activities to your model at a later time. Moreover, this requires looping, and this could slow down your simulation if you have many Objects to loop through.
This is where Index becomes useful.
Firstly, make sure to give your 6 Activities, an Index from 1 to 6. You can edit this directly via the Quick view window. This is to make sure Index can be used for cell referencing, in a way that matches your spreadsheet, i.e. where you want results to be placed.
Then, instead of looping, we can use Index to point SIMUL8 to the cell it should increment.
Tips
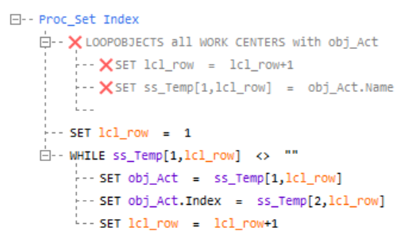
Changing the Index of each Activity manually can be lengthy in models with many Activities. You can assign the Index automatically by creating a Visual Logic section which executes the following:
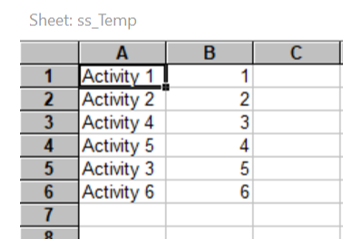
1. Using Loop Object, we can loop through each Activity and temporarily store its name on a spreadsheet, that we can then use. Let’s call it ss_Temp.

2. Type in the second column the Index for each Activity, as follows:

3. Once we have all our Activities’ names correctly written on the first column of ss_Temp, we no longer need the section under the Loop Object command, and we disable these lines, by selecting them and pressing Alt+D.
4. We will then loop through all these names, set each cell to be obj_Act, and then set the Index of obj_Act to the corresponding cell on the second column.

That way, we set the right Index value to the right Object way more quickly.

