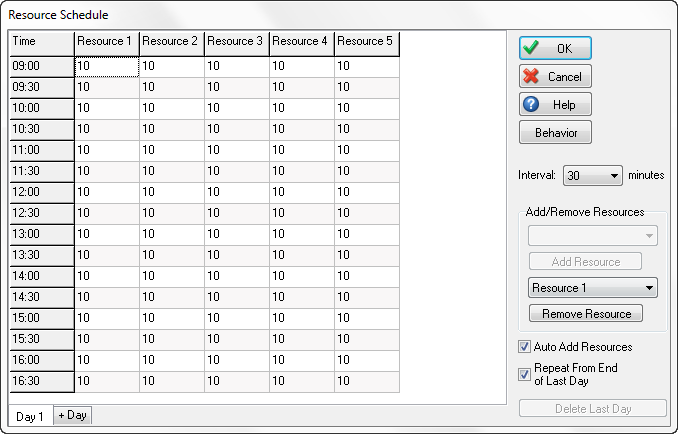
Resource Schedule
The Resource Schedule can be used to vary the number of Resources that are available during a day. This is useful for systems such as restaurants where there will be more staff available during meal times to cope with peak demand than at other times of the day. Similar planning can be observed in hospitals, contact centers and many other processes.
Shifts can also be used to achieve this effect however, the Resource Schedule is a faster way of achieving this, particularly when the numbers of Resources change within short regular timeframes (e.g. in 15 minute intervals).
The Interface
To Locate this feature go to ‘Data and Rules’ then the ‘Objects’ section and select ‘Resource Schedule’. Upon opening you will be presented with a table stating all current Resources along the top and timeframes on the left-hand side. The numbers in the cells control the number of Resources that should be available for each Resource and for each timeframe. For instance changing the first cell to a value of 5 would mean that in the first timeframe (default value is for 1 hour intervals) then there would only be 5 of the Resource available.

Additionally the Resource Matrix includes the following options:
• Interval: change the interval to one of the options from the dropdown list. Changing the interval will immediately add/remove entries (rows) to/from the matrix to reflect the number of intervals per day. Please note that the start and end time for the Resource schedule are read in from the clock settings (start time and duration of each day). E.g. changing the interval from 60 minutes to 30 minutes will double the number of rows listed in the matrix and it will update the times associated with each slot.
• Add Resource: To add Resources that are not on the Resource schedule, simply select the Resource name from the dropdown and click the Add Resource button. Please note that this option is greyed out when all Resources are listed on the Resource schedule.
• Remove Resource: Simul8 will automatically add all Resources from the model to the Resource schedule. Individual Resources can be removed from the Resource matrix by selecting the Resource name from the dropdown and clicking the Remove Resource button.
• Auto Add Resources: when this option is ticked new Resources will be added to the Resource schedule automatically.
• Repeat from End of last day: when this option is ticked the simulation will schedule Resources for each of the days for which it finds data and starts over from Day 1 once it has cycled through all days. • +Day: click this button to add a new data sheet to the Resource schedule. Each sheet holds data for one day so that the number of Resources per interval can vary between days of the week to allow for daily work patterns.
• Day X: select a sheet to cycle through the Resource schedule for each of the days listed.
• Delete last day: click this button to delete the selected sheet. This option is greyed out as long as the Resource schedule only holds information for one day.