Collect / Assemble Work Items
This routing in discipline lets you collect a specified number of Work Items from one or several Queues, before you start processing them together.
For example, you might want to pack 12 bottles of whiskey into a box at a bottling plant; you might need to wait for 100 units before you put them into the oven as a batch; or you will need a passenger and their suitcase to be present before they can proceed to the airport security.
Only when the number of Work Items required have all been collected at an Activity, will it start working.
How to use Collect
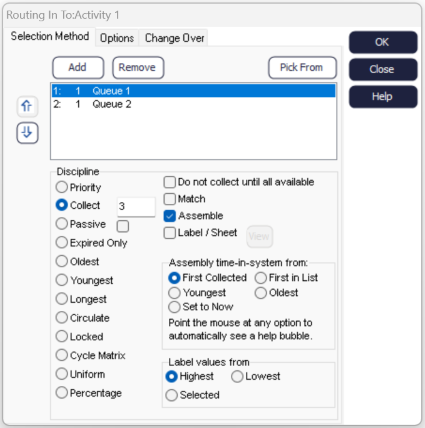
Collect is a routing in discipline and can be found in an Activity’s routing in dialog (under Properties). By using the input box next to Collect, we define how many Work Items are being collected from the highlighted Queue.
If you want to collect all of the Work Items from a Queue, you can enter ALL.
Note: 10,000 is the highest collect number you can enter here, if you wish to collect up to 32,000 Work Items, please see Label/Sheet below.
Collect Options
Do Not Collect Until All Available
This option tells the Activity not to collect any of the required Work Items from their feeding objects until all the required Work Items are available. This option is available if all the feeding objects are Queues or if the feeding object is a Start Point using the Unlimited function.
“Do not collect until all available” will be greyed out if one of feeding Queues has a minimum wait time applied to it.
Match
Matching causes the Activity to collect only items with identical Label content (checking the “Match” check box will allow you to select the Label name to use). For example, at an airport security process, you can match a passenger with their suitcase. Likewise, in a healthcare process, patients often need to collect their own test results. Unique Label are commonly used for this purpose when batched out at some earlier stage of the process.
Assemble
Assemble (the default) pulls together all the items collected into a single Work Item. For example, in manufacturing, component parts are often assembled together into the final product that is being produced. Uncheck this box if you want all the Work Items kept separate.
Assembly time-in-system from:
When assembling Work Items, you can specify which of the individual Work Items will dictate the time in system result of the assembled unit. You can choose from the following options:
- First collected: Uses the time on the first Work Item collected
- First in List: Uses the time on the Work Item that comes from the first source object in the list of source objects above
- Youngest: Uses the most recent time found on any of the collected Work Items
- Oldest: Uses the time on the oldest of the collected Work Items
- Set to Now: Uses the time that the final work Item is collected (the time in system for the Work Item started at the time it was assembled at the Activity)
Label Values from
When assembling Work Items with different Label values, Simul8 must make a choice of which of these values will be applied to the newly assembled item. Label values of the final assembled Work Items can be sourced from either:
- Highest: The Work Item with the highest Label value (the default setting)
- Lowest: The Work Item with the lowest Label values.
- Selected: The Work Item that enters the Activity from the highlight source object.
Label / Sheet
Checking the Label / Sheet option will allow an Activity to use Simul8’s variable collect feature. With this, you can define how many Work Items are collected, based on another Work Item's Label value.
For instance, we might have a Work Item representing a product type. Then, based on its product type Label, we want to collect a certain number of Work Items from other Queues feeding into that Activity.
Some examples of when this would be useful:
- Different car models on the same production line require different combinations of parts;
- Patients in an emergency department have different diagnostics tests and are required to collect different test results;
- Orders in a restaurant are made up of variable combinations of dishes.
Once Label / Sheet is selected, a dialog will appear to select the Label and the internal spreadsheet you want to use.
Use the Select Label dropdown to choose the Label that will be referenced to control the collection of items. For example, the product type.
Use the Select sheet dropdown to choose which spreadsheet contains the matrix of how many Work Items need to be collected from each incoming Queue depending on the Label value.
Use the New button at the side of each dropdown to create a new Label or sheet if you do not yet have any Label or spreadsheets in your simulation for this purpose.
High Volume: When using Collect with a high-volume Activity, we are not collecting Work Items based on their count, but instead Simul8 looks at the Quantity Label on each Work Item and uses its value to determine how many Work Items to bring into the Activity. If necessary, a Work Item will be split into two Work Items to leave some “quantity” in the prior Queue and bring some into the Activity.
Note: While you can enter any value as the collect number into the spreadsheet, 32,000 is the highest number that can be collected. If you try to collect more than this, some Work Items may be lost. The Simulation Assistant will notify you if one of your collect values breaches this limit.
